
If you’ve ever stared at an Arduino Starter Kit and thought, “Looks cool… but what can I actually do with this?” — you’re not alone.
The truth is, Arduino has a reputation for being powerful, but for beginners, it can also look like a tangled web of wires, resistors, and intimidating code. The good news? That little box of components is your gateway to creating real, working electronics — no engineering degree required.
In this blog, we’re unpacking the 7 most fun, beginner-friendly projects you can build with a standard Arduino Starter Kit. Each one is simple, rewarding, and teaches a core concept that builds your confidence — and your skills.
Let’s dive in.
What’s Inside an Arduino Starter Kit?
Before we jump to the projects, here’s a quick refresher on what you usually get:
- Arduino Uno board
- Breadboard
- Jumper wires
- LEDs (various colours)
- Resistors
- Push buttons
- Potentiometer
- Light sensor (photoresistor)
- Temperature sensor
- Buzzer or piezo speaker
- Servo motor
- LCD display (in some kits)
If your kit includes these basics — you’re ready to build.
1. The Classic LED Blinker
Difficulty: Super Easy
What You’ll Learn:
- Writing your first Arduino sketch
- Uploading code to the board
- Understanding pins and digital signals
Why It’s Great:
This is the “Hello, World!” of Arduino. You’ll make an LED blink on and off at regular intervals. It’s simple but incredibly satisfying — and shows you the basic structure of any Arduino program.
Extra Challenge: Change the timing of the blink, or add a second LED.
2. Push-Button LED Toggle
Difficulty: Super Easy
What You’ll Learn:
- How to use input from a button
- Debouncing basics
- Conditional logic (if-else statements)
What It Does:
Press the button once, the LED turns on. Press it again, it turns off. It’s a simple toggle switch.
Real-Life Use Case: This is the foundation for things like power buttons, counters, and even keypads.
3. Light-Sensitive Night Light
Difficulty: Easy
What You’ll Learn:
- Reading analog values
- Using photoresistors (light sensors)
- Controlling LED brightness
How It Works:
As the room gets darker, the LED gets brighter — like a DIY night lamp.
Bonus Idea: Replace the LED with a strip of fairy lights or use multiple LEDs for effect.
4. Temperature Monitor with Serial Output
Difficulty: Easy
What You’ll Learn:
- Using a temperature sensor
- Sending data to your computer via the Serial Monitor
- Data reading and calibration
Why It’s Fun:
You get to see real-time temperature readings on your screen — it’s like making your own little weather station.
Extra Challenge: Add a condition that lights up an LED if the temperature crosses a certain threshold.
5. Simple Buzzer Alarm System
Difficulty: Easy
What You’ll Learn:
- Using a piezo buzzer
- Writing conditional code
- Triggering sounds based on input
What It Does:
When triggered by a condition (e.g. darkness or button press), the buzzer plays an alarm.
Use Case: Think of this as the base for a motion-detection alarm or intruder alert system.
6. Servo Motor Control with Potentiometer
Difficulty: Intermediate
What You’ll Learn:
- Using analog input to control movement
- Mapping values (0–1023 to 0–180)
- Servo motor basics
Why It’s Cool:
Twist the knob, and the servo rotates. This gives you hands-on experience with controlling physical objects — perfect for robotics.
Next Step: Use it to build a robotic arm, door lock, or even a mini radar system.
7. Mini LCD Display: Show a Message
Difficulty: Intermediate
What You’ll Learn:
- Wiring an LCD screen
- Using the LiquidCrystal library
- Displaying characters and numbers
Why It’s Powerful:
Seeing a custom message (like “Welcome!” or “Temp: 23°C”) appear on a screen you wired and coded is incredibly satisfying.
Beginner Tips: Start by displaying static text. Then try printing live sensor values.
Why These Projects Matter
Here’s what each project is really teaching you:
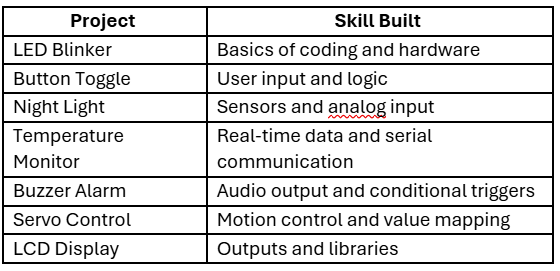
In just 7 projects, you’ll touch almost every major component of your kit and gain the confidence to build bigger ideas.
“But Can I Build Something Real with This Kit?”
Yes, and that’s the beauty of Arduino.
The projects above aren’t just classroom exercises — they’re the building blocks of real-world inventions. Want to build a plant watering system? Start with sensors. Want to create a home automation dashboard? Begin with LEDs and switches.
Arduino Starter Kits are designed to help you prototype real things, not just blink LEDs.
Tips to Get the Most Out of Your Starter Kit
- Follow tutorials — but tweak them. Change values, add a second component, break and fix things. That’s how you learn.
- Keep a notebook. Track what you tried, what failed, and what worked.
- Learn to read datasheets. They look boring but are goldmines for understanding components.
- Use the Arduino IDE’s Serial Monitor. It’s your best debugging friend.
- Once you’re confident, try combining projects. For example, trigger a servo when a sensor detects something.
Is the Arduino Starter Kit Worth It?
Absolutely — if you’re curious about electronics or coding, the Arduino Starter Kit is one of the best hands-on learning tools out there.
You’re not just buying parts. You’re buying:
- A learning ecosystem
- A problem-solving mindset
- A skillset that scales up to robotics, IoT, and automation
For beginners, it’s a powerful (yet approachable) playground.